
DISCLAIMER: The following *WILL* invalidate any warranties with your DVMega and I will not be held responsible for any damage caused to any item during any attempts to replicate the following.
NOTE: I do not own a DVMega (yet!) and have been unable to confirm this process. Whilst it is achievable, there may be some slight inaccuracy in my interpretation of the process as relayed to me by others. Some tinkering may be required to get it to work.
UPDATE: Since delivery of my own DVMega, I have used this procedure countless times and have proved it to work!
UPDATE (30/9/16): v3.04 of the DVMega firmware has been available for a couple of days and I have again successfully used this procedure to flash my DVMega. I can assure the nay-sayers that it does work. I will caveat my last comment – getting this to work hasn’t always been smooth sailing for me either – it’s always worked on my own kit, but others I have assisted seem to have been more problematic but once you have dedicated access to the serial port on the Raspberry Pi, this works 100%. It’s following the steps to free up the serial port that seem to be the sticking point for most. If you already have a working DVMega setup, in all likelihood you’ve already followed the instructions to free up the serial port or you are using an image that has had this done already. If not, you need to go to my other HOW-TO on setting up MMDVMHost and more specifically disabling system processes which by default use the serial port. This is normally enough to gain dedicated access to the serial port for the DVMega, however here are some further pointers on RPi serial ports should you run into difficulty (thanks to “Steve” for putting me onto this one in the comments).
If you own a DVMega, you will know that periodically, new firmware is released to introduce new features. To reprogramme the on-board ATMEGA328 chip on a single band DVMega is fairly straight forward – just unplug the chip from the DVMega and place it in an Arduino. What about the dual band DVMega with its SMD ATMEGA328 and what if you don’t own an Arduino?
Tom, ON4TOP has come to your rescue. He has figured out that it is possible to flash the DVMega firmware using the Rpi itself with the DVMega still in situ by wiring the reset pin of the ATMEGA328 directly to a spare GPIO port and then using (a slightly modified version of) avrdude to flash the hex file straight over /dev/ttyAMA0. The same procedure works just as well on a single band DVMega if you don’t have an Arduino UNO to hand.
The first step will invalidate the warranty on your DVMega, proceed with caution and at your own risk.
Solder a wire between the reset pin of the ATMEGA328 and GPIO4/Pin7 of the header on the DVMega.
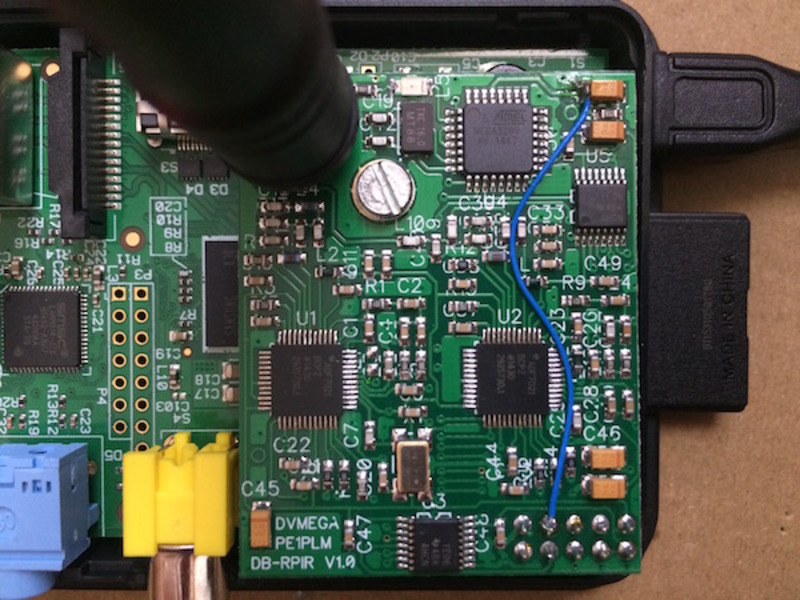

The first picture above depicts the dual band DVMega. On a single band DVMEga (second picture) you can achieve the same result by soldering to the bottom edge of the SMD capacitor (C45) to the left of the ATMEGA328 chip. In all cases, the wire goes back to GPIO4/Pin7 as shown in the first picture.
I cannot stress the last point strongly enough, so I will repeat it – If you have previously followed the instructions available on the DVMega website and soldered the wire to Pin4 (yes, Pin4 and GPIO4 are 2 separate things – this can cause confusion!) for programming using the BlueStack board, YOU MUST RESOLDER TO GPIO4/Pin7.
Have a look at this …

… no prizes for getting the answer that if you connect a DVMega with the wire soldered as per the instructions for the BlueStack board, the reset pin will be held high all the time – that’s not going to work for this method! Anyway, I digress …
Next you need to download a couple of bits of software to the Rpi.
sudo apt-get update
sudo apt-get install git avrdude python-dev python-rpi.gpio
git clone https://github.com/openenergymonitor/avrdude-rpi.git
cd avrdude-rpi
sudo cp autoreset /usr/bin
sudo cp avrdude-autoreset /usr/bin
sudo mv /usr/bin/avrdude /usr/bin/avrdude-original
sudo ln -s /usr/bin/avrdude-autoreset /usr/bin/avrdude
After ensuring that no other software is attempting to use /dev/ttyAMA0 (such as ser2net or MMDVMHost) you can flash the firmware directly to the ATMEGA328 and avrdude will signal the ATMEGA328 to reset to bootloader before flashing …
avrdude -p m328p -c arduino -P /dev/ttyAMA0 -b 115200 -F -U flash:w:<filename> -v
Where <filename> is the firmware file downloaded from here.

Interesting article can this be done using a raspberry Pi3
LikeLike
Absolutely ….
LikeLike
I’m late to the party here, but to get this working on the Raspberry Pi 3B as of December 21, 2018, first do: `$ raspi-gpio set 4 op` to put GPIO 4 into output mode.
LikeLike
So… could I do this on the pi-star image or would it be best to do on a clean image on the Pi3 , sorry all new to this stuff but the guide seems simple enough to follow , what would be the best image to do this on. many thanks
LikeLike
Hi,
I Tried this and the “Flash your DV-Mega from Pi-Star” procedure from the pi-star wiki – neither worked for me. I have the jumper soldered per your pix (thanks) – definitely on pin 7. I have a dual band DVMega and the latest pi-star Image. The procedure off the wiki page has a shell script that seems to handle disabling the services which use the serial port but I wonder if it’s up to date with Jessie. In either case, I get a hang for over 40 seconds on my Pi 3 B and I start getting over-temp indications on the console screen (I happened to have the web server up on one attempt and the temp went from yellow to red quickly) – reading that this should only take 5 seconds or so, I hit control C to keep my pi from burning up. At that point I see a bunch of error messages rip off the screen followed by hundreds of broken pipe messages (I know at least some are normal) The broken pipe messages fill my putty buffer so I can’t see the first error messages. If I pipe it to a tee with a “flash.log” file, I get nothing. This is pretty frustrating. Anybody else try this from the Latest Pi-Star in recent weeks ? 😦
Ron W4VM
LikeLike
I believe Andy has already included all the relevant bits to do this in Pi-star.
LikeLike
I got some errors. was working with Arduino UNO. but i’m still interested to have this way working. May be is related with pi-star version. WIP.
LikeLike
A friend of mine has a single band dvmega about 3-4 years old and never done anything to it. He currently uses it for dstar and runs Maryland dstar on a pi3 B+. If he creates a pi-star image and tries to boot it currently will he be able to upgrade the dvmega firmware using pi-star SSH method or will the dvmega not talk to the pi-star image. All of this after adding the wire of course. I am trying to guide him at a distance and find the easiest and simplest way possible. Thanks for the advise
LikeLike
That should work, although I’ve not tried to update my firmware via Pi-star!!
LikeLike
How do I setup a dvmega above a tncpi device? What is my device called then?
LikeLike
Honestly, not owning a tncpi, I have no idea ….?!
LikeLike
Thank you this page helped me to update my dual band dvmega using a raspberry pi and the SSH Access within pistar.
The wire to pin 7 of the GPIO as pictured on here was the key part I was missing.
LikeLike
[…] documenté par Tom, ON4TOP. Tony Corbett, G0WFV, en discute en détail sur son blog Radio Geek, HOW-TO Update DVMega firmware without a programmer or an Arduino△. Cet article est une traduction en francais de l’article sur […]
LikeLike
I followed the instructions and upgrade from version 2.28 to 3.26 was a success. Thank you
LikeLike
I get to the last command, where I’m supposed to enter the file name and it won’t recognize my file location. Do I point it to the unzipped hex file or the zipped file? Neither seems to work. I put the file on the root of my C drive..
Thanks for the help in advance
LikeLike
Will the older DVMEGA Dual Band work on the Raspberry Pi 4 Model B
LikeLike
Apologies for the very slow reply – I’ve not been very active on the internet or amateur radio in recent years! It should work ……
LikeLike
[…] Note: This method, which was figured out by Tom, ON4TOP. Tony Corbett, G0WFV, discusses it in particular on his Radio Geek web log, HOW-TO Update DVMega firmware without a programmer or an Arduino : […]
LikeLike