DISCLAIMER: The following *WILL* invalidate any warranties with your DVMega and I will not be held responsible for any damage caused to any item during any attempts to replicate the following.
NOTE: I do not own a DVMega (yet!) and have been unable to confirm this process. Whilst it is achievable, there may be some slight inaccuracy in my interpretation of the process as relayed to me by others. Some tinkering may be required to get it to work.
UPDATE: Since delivery of my own DVMega, I have used this procedure countless times and have proved it to work!
UPDATE (30/9/16): v3.04 of the DVMega firmware has been available for a couple of days and I have again successfully used this procedure to flash my DVMega. I can assure the nay-sayers that it does work. I will caveat my last comment – getting this to work hasn’t always been smooth sailing for me either – it’s always worked on my own kit, but others I have assisted seem to have been more problematic but once you have dedicated access to the serial port on the Raspberry Pi, this works 100%. It’s following the steps to free up the serial port that seem to be the sticking point for most. If you already have a working DVMega setup, in all likelihood you’ve already followed the instructions to free up the serial port or you are using an image that has had this done already. If not, you need to go to my other HOW-TO on setting up MMDVMHost and more specifically disabling system processes which by default use the serial port. This is normally enough to gain dedicated access to the serial port for the DVMega, however here are some further pointers on RPi serial ports should you run into difficulty (thanks to “Steve” for putting me onto this one in the comments).
If you own a DVMega, you will know that periodically, new firmware is released to introduce new features. To reprogramme the on-board ATMEGA328 chip on a single band DVMega is fairly straight forward – just unplug the chip from the DVMega and place it in an Arduino. What about the dual band DVMega with its SMD ATMEGA328 and what if you don’t own an Arduino?
Tom, ON4TOP has come to your rescue. He has figured out that it is possible to flash the DVMega firmware using the Rpi itself with the DVMega still in situ by wiring the reset pin of the ATMEGA328 directly to a spare GPIO port and then using (a slightly modified version of) avrdude to flash the hex file straight over /dev/ttyAMA0. The same procedure works just as well on a single band DVMega if you don’t have an Arduino UNO to hand.
The first step will invalidate the warranty on your DVMega, proceed with caution and at your own risk.
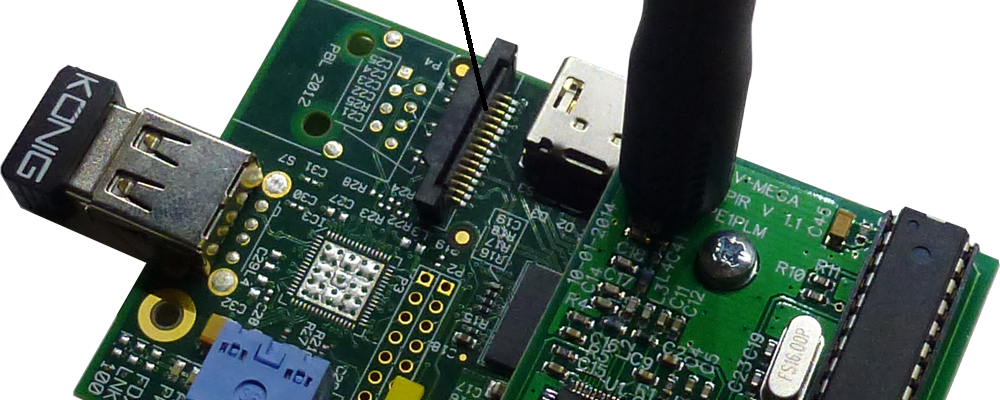
Solder a wire between the reset pin of the ATMEGA328 and GPIO4/Pin7 of the header on the DVMega.

The first picture above depicts the dual band DVMega. On a single band DVMEga (second picture) you can achieve the same result by soldering to the bottom edge of the SMD capacitor (C45) to the left of the ATMEGA328 chip. In all cases, the wire goes back to GPIO4/Pin7 as shown in the first picture.
I cannot stress the last point strongly enough, so I will repeat it – If you have previously followed the instructions available on the DVMega website and soldered the wire to Pin4 (yes, Pin4 and GPIO4 are 2 separate things – this can cause confusion!) for programming using the BlueStack board, YOU MUST RESOLDER TO GPIO4/Pin7.
Have a look at this …

… no prizes for getting the answer that if you connect a DVMega with the wire soldered as per the instructions for the BlueStack board, the reset pin will be held high all the time – that’s not going to work for this method! Anyway, I digress …
Next you need to download a couple of bits of software to the Rpi.
sudo apt-get update
sudo apt-get install git avrdude python-dev python-rpi.gpio
git clone https://github.com/openenergymonitor/avrdude-rpi.git
cd avrdude-rpi
sudo cp autoreset /usr/bin
sudo cp avrdude-autoreset /usr/bin
sudo mv /usr/bin/avrdude /usr/bin/avrdude-original
sudo ln -s /usr/bin/avrdude-autoreset /usr/bin/avrdude
After ensuring that no other software is attempting to use /dev/ttyAMA0 (such as ser2net or MMDVMHost) you can flash the firmware directly to the ATMEGA328 and avrdude will signal the ATMEGA328 to reset to bootloader before flashing …
avrdude -p m328p -c arduino -P /dev/ttyAMA0 -b 115200 -F -U flash:w:<filename> -v
Where <filename> is the firmware file downloaded from here.

Assume you mean DVMega here…
“The first step will invalidate the warranty on your MMDVM, proceed with caution and at your own risk.”
Anyway, thanks for documenting the procedure!
LikeLike
Hah! Yes! Too many things floating around my head at once! Changed it. Thanks.
LikeLike
I’m getting this at the end, but it seems to work ok:
strace: |autoreset: Broken pipe
Any concerns?
LikeLike
I get the same – as you say, it works fine. Not sure what causes the broken pipe message though!
LikeLike
Hi Tony, i get the same message, broken pipe, how i solutions it? i don’t update firmware my DVMEGA dual, can i help me? tanks
PU1MAF alexandre.
LikeLike
It work’s perfect…easy to use. Great solution.
BTW..to purchase a programmer for the dualbandradio is not needed :-))
73’s
Herbert dl4sdr
LikeLike
[…] HOW-TO Update DVMega firmware without a programmer or an Arduino […]
LikeLike
I tried taking the chip out of my DV-Mega singleband RPI and sticking it into an Arduino UNO to program it. But I had some serious problems getting the programmer to run on the DV-MEGA chip (Atmel 328). So I used the one that was in the Arduino originally, is that OK too? For some reason avrdude just won’t work with the one that one, it says it fails to sync.. But with the original Uno chip I could program the firmware just fine.
LikeLike
I’m not too sure, if I’m honest.
LikeLike
To follow up on this comment …
The more I’ve played with the DVMega the more things I, and others, have experienced flashing firmware to them. Any ATMEGA328 chip with the Arduino bootloader installed is fine to flash – theoretically (but I don’t know why you’d want to!) you could have multiple chips with different firmware versions that you pop in and out of the (single band) DVMega at will!
LikeLike
Thanks! Unfortunately it doesn’t work with ser2net. It connects but doesn’t detect the DVMEGA. Just once I saw it detected as 2.26.
I tried the old chip and the old G4KLX software and it works fine with the old D-Star image so the hardware is OK. But still it fails to program the old chip if I put it in the Arduino UNO. Tried it with avrdude direct and through X-Loader.
I’ll try the MMDVMHost today, perhaps that will work better. Would be great to get on DMR from here in Ireland because there is no digital repeater infrastructure whatsoever 😦
LikeLike
Just to give some feedback: It does work with ser2net now. Getty was still trying to access the com port even though I had it set to disabled, strange.
Even though the original Atmega 328 still won’t program in my (genuine, by the way) Arduino UNO, it works totally fine with the chip that came with the UNO, loaded up with the DVMega 2.26 firmware. That’s actually nice, because I can still use it the ‘old’ way by swapping the ATMega and the old SD card in the raspberry.
I have it running with bluespot fine now, works pretty nice. I’d prefer MMDVMHost though as I won’t need an Android device running all the time, but I still seem to have some issues there. It seems to receive my D-Star and DMR packets when I turn on the debug but it never does anything with them, it just says Connect in Idle mode. Never mind, I’ll manage that 🙂
I just wanted to give some feedback regarding the use of another Atmega chip with arduino bootloader, so yes that works.
LikeLike
Glad to hear you got it working, Gekke 🙂
When you say the original ATMEGA328, is that the one that came on the DVMega or one you bought somewhere else? I’m just wondering if it has the Arduino Bootloader on it? If it hasn’t, it may explain why it doesn’t work…
LikeLike
Do i have the soldered cable only when loading the new frimware or i can have it soldered all the time ?
LikeLike
It can stay on once updated
LikeLike
Hi Tony . What flash file are you using and it’s location
LikeLike
Hi Alan.
The flash files are available from http://www.dvmega.auria.nl/Downloads.html
LikeLike
Hi Tony,
This is my first attempt at this. Never owned a Raspberry Pi before. My setup is Raspberry Pi 2B with DVMega single band board currently running v2.26. I have the wire soldered as show for the single band DVMega. I then entered the commands above, but when I got to sudo cp autoreset /usr/bin, it said the directory did not exist. I’m using the Maryland D-Star image. My objective is to operate as a DMR hotspot only as there are no DMR repeaters in my corner of Ohio.
Any suggestions on the /usr/bin directory issue. Also I have downloaded the Bluespot_V227_UNO.ccp.hex and have that on my PC. I need to move that to the Pi. What directory does that need to be in?
Larry
W8LIG
LikeLike
The hex file can be in any directory – as long as you know where it is and you can point avrdude at it once avrdude is installed.
As for the /usr/bin issue, I’m not sure what the issue could be? As far as I am aware, /usr/bin is a directory that *should* exist on ALL *nix variations (I’ve not come across one that hasn’t – YET!?!) I don’t use pre-configured images so am unfortunately not overly familiar with the Maryland D-Star image but a quick look at their website tells me it is based on Raspian Wheezy so the directory should be there.
Perhaps if you paste up a dump of the error something might spring out at me?
LikeLike
HI Tony – thanks for the post! How does one determine the current firmware version of their DVMega?
LikeLike
It depends what software you’re running.
MMDVMHost, it will tell you when it starts.
BlueSpot – click the info button and it tells you too.
As for ircDDBGateway, I’ve no experience with this one, but I assume (as it’s written by the same person as MMDVMHost) it will tell you somewhere.
LikeLike
How long does the flash process take?
LikeLike
About 5 seconds …
LikeLike
Followed all directions and the screen says programmer is not responding. What am I doing wrong?
LikeLike
It could a one of a few things? Without physically seeing how you have soldered the wire or what’s happening on your Raspberry Pi, it’s difficult to tell.
LikeLike
Did you ever get this resolved, John? It seems we both were having the same issue.
LikeLike
Did this:
pi@mmdvm:~ $ sudo avrdude -p m328p -c arduino -P /dev/ttyAMA0 -b 115200 -F -U flash:w:DVMEGA_RADIOHOTSPOT_V173_UNO.cpp.hex -vavrdude-
Doesn’t look like it worked, because MMDVMHost says it cant read firmware. Help?
LikeLike
Hi Scott,
I also replied to you in the MMDVM Yahoo Group.
avrdude-original: reading input file “DVMEGA_RADIOHOTSPOT_V173_UNO.cpp.hex”
You need to be using the version 2.28 firmware from here … http://www.dvmega.auria.nl/Downloads.html
LikeLike
Hi i have trouble programing my single band dv_mega i think ? Its on a raspberry pi and had v2.26 firmware . Now i tried the trick solder a wire to GPIO4 pin7 as told .. When i try to flash new firmware i downloaded 2.28 for raspberry pi .. named DVMEGA_RHV228_UNO.cpp.hex but it wont start .. But if i use DVMEGA_RHV228_MEGA.cpp.hex it start programming the dv_mega ..And it seems alright . Am i using the right firmware to my single band dv_mega ? I cant start mmdvm and get any firmware confirmation any more after flashing with DVMEGA_RHV228_MEGA.cpp.hex .. Strange? Do you have any tip for me get it working ?
//SA7ADV
LikeLike
Edit: I got it work on a raspberry pi 2 with a clean raspimage . But i had to try two times before it loaded the new firmware without problem .. 🙂
//SA7ADV
LikeLike
LED on Dvmega begins to blink rapidly but screen says “set_recv():programmer is not responding” ten times then exits avrdude but LED keeps blinking rapidly.
LikeLike
You’ve done something wrong.
LikeLike
Could it be the serial port /dev/ttyAMA0 is in use by another program? How can I ensure that no other program is trying to use this port as it says in the instructions?
LikeLike
Hello Abraham, Did you ever find a resolution to this?
LikeLike
Tried this method after verifying that no sr2net or mmdvm would interfere and this is what I get:
pi@raspberrypi:~ $ avrdude -p m328p -c arduino -P /dev/ttyAMA0 -b 115200 -F -U flash:w:/home/pi/Downloads/DVMEGA_HB_V229_UNO.cpp.hex -v
avrdude-original: Version 6.1, compiled on Jul 7 2015 at 10:29:47
Copyright (c) 2000-2005 Brian Dean, http://www.bdmicro.com/
Copyright (c) 2007-2014 Joerg Wunsch
System wide configuration file is “/etc/avrdude.conf”
User configuration file is “/root/.avrduderc”
User configuration file does not exist or is not a regular file, skipping
Using Port : /dev/ttyAMA0
Using Programmer : arduino
Overriding Baud Rate : 115200
avrdude-original: Using autoreset DTR on GPIO Pin 7
avrdude-original: stk500_recv(): programmer is not responding
avrdude-original: stk500_getsync() attempt 1 of 10: not in sync: resp=0x00
avrdude-original: stk500_recv(): programmer is not responding
avrdude-original: stk500_getsync() attempt 2 of 10: not in sync: resp=0x00
avrdude-original: stk500_recv(): programmer is not responding
avrdude-original: stk500_getsync() attempt 3 of 10: not in sync: resp=0x00
avrdude-original: stk500_recv(): programmer is not responding
avrdude-original: stk500_getsync() attempt 4 of 10: not in sync: resp=0x00
avrdude-original: stk500_recv(): programmer is not responding
avrdude-original: stk500_getsync() attempt 5 of 10: not in sync: resp=0x00
avrdude-original: stk500_recv(): programmer is not responding
avrdude-original: stk500_getsync() attempt 6 of 10: not in sync: resp=0x00
avrdude-original: stk500_recv(): programmer is not responding
avrdude-original: stk500_getsync() attempt 7 of 10: not in sync: resp=0x00
avrdude-original: stk500_recv(): programmer is not responding
avrdude-original: stk500_getsync() attempt 8 of 10: not in sync: resp=0x00
avrdude-original: stk500_recv(): programmer is not responding
avrdude-original: stk500_getsync() attempt 9 of 10: not in sync: resp=0x00
avrdude-original: stk500_recv(): programmer is not responding
avrdude-original: stk500_getsync() attempt 10 of 10: not in sync: resp=0x00
avrdude-original done. Thank you.
strace: |autoreset: Broken pipe
pi@raspberrypi:~ $
Thanks Gary
LikeLike
I’ve had this problem once before and I could not find what was hogging the port. Unfortunately I had to start from a fresh image and the problem went away.
LikeLike
Thanks Brian,
Will have to try that again with a basic image.
Won’t be for a couple weeks when I get back from my trip.
Gary
LikeLike
I have the same result on raspberry pi2\3 with 2016-05-27-raspbian-jessie-lite 😦
—
pi@raspberrypi:~/avrdude-rpi $ avrdude -p m328p -c arduino -P /dev/ttyAMA0 -b 38400 -F -U flash:w:DVMEGA_HB_V229_UNO.cpp.hex -v
avrdude-original: Version 6.1, compiled on Jul 7 2015 at 10:29:47
Copyright (c) 2000-2005 Brian Dean, http://www.bdmicro.com/
Copyright (c) 2007-2014 Joerg Wunsch
System wide configuration file is “/etc/avrdude.conf”
User configuration file is “/root/.avrduderc”
User configuration file does not exist or is not a regular file, skipping
Using Port : /dev/ttyAMA0
Using Programmer : arduino
Overriding Baud Rate : 38400
avrdude-original: Using autoreset DTR on GPIO Pin 7
avrdude-original: stk500_recv(): programmer is not responding
avrdude-original: stk500_getsync() attempt 1 of 10: not in sync: resp=0x00
avrdude-original: stk500_recv(): programmer is not responding
avrdude-original: stk500_getsync() attempt 2 of 10: not in sync: resp=0x00
avrdude-original: stk500_recv(): programmer is not responding
avrdude-original: stk500_getsync() attempt 3 of 10: not in sync: resp=0x00
avrdude-original: stk500_recv(): programmer is not responding
avrdude-original: stk500_getsync() attempt 4 of 10: not in sync: resp=0x00
avrdude-original: stk500_recv(): programmer is not responding
avrdude-original: stk500_getsync() attempt 5 of 10: not in sync: resp=0x00
avrdude-original: stk500_recv(): programmer is not responding
avrdude-original: stk500_getsync() attempt 6 of 10: not in sync: resp=0x00
avrdude-original: stk500_recv(): programmer is not responding
avrdude-original: stk500_getsync() attempt 7 of 10: not in sync: resp=0x00
avrdude-original: stk500_recv(): programmer is not responding
avrdude-original: stk500_getsync() attempt 8 of 10: not in sync: resp=0x00
avrdude-original: stk500_recv(): programmer is not responding
avrdude-original: stk500_getsync() attempt 9 of 10: not in sync: resp=0x00
avrdude-original: stk500_recv(): programmer is not responding
avrdude-original: stk500_getsync() attempt 10 of 10: not in sync: resp=0x00
avrdude-original done. Thank you.
—
LikeLike
I had the same issues as above. After much googling I eventually found and fixed the problem. Others far cleverer than me worked this out but here are the steps:
1. raspi-config and disable console over serial
2. edit /boot/config.txt and change enable_uart=0 to enable uart=1
3. systemctl disable ModemManager.service
It appears that the ModemManager.service restarts quite often. I had to enter step 3 a number of times before the port was eventually released.
Finally, I believe the baud rate has to be 115200
LikeLiked by 1 person
Anything is worth a try, Steve! I’ve had a previously working system completely refuse to access the serial port for some unknown reason and refuse to recover. My solution was to start from scratch with a fresh install, but interesting to learn about the ModemManager service. Thanks for the info.
LikeLike
Same problem. Simply does not work…
LikeLike
OK, so I’ve been trying to set this up over email with someone else, and he too was encountering problems. The answer was posted in this thread immediately before your comment, although I missed its significance too!
Apparently a “bug” has crept into the Jessie distro which screws with the serial port. Have a look at this webpage – http://stackoverflow.com/questions/38140315/rpi2-uart-setup-operation-issues
I’m running Jessie Lite which doesn’t have the ModemManager service, and I’ve not seen the enable_uart=0/1 in my config.txt, so am effectively running without the line in mine.
Can you let me know if this works, and if you’re running Jessie or Jessie Lite please. if so, I’ll update the post to add this tip.
LikeLike
Good work, after several attempts succeeded.
LikeLike
Tried to program using pi3 with single band mega board using your image,
Got these results:
avrdude -p m328p -c arduino -P /dev/ttyAMA0 -b 115200 -F -U flash:w:DVMEGA_HR_V306_UNO.cpp.hex -v
avrdude-original: Version 6.1, compiled on Jul 7 2015 at 10:29:47
Copyright (c) 2000-2005 Brian Dean, http://www.bdmicro.com/
Copyright (c) 2007-2014 Joerg Wunsch
System wide configuration file is “/etc/avrdude.conf”
User configuration file is “/root/.avrduderc”
User configuration file does not exist or is not a regular file, skipping
Using Port : /dev/ttyAMA0
Using Programmer : arduino
Overriding Baud Rate : 115200
avrdude-original: Using autoreset DTR on GPIO Pin 7
avrdude-original: stk500_recv(): programmer is not responding
avrdude-original: stk500_getsync() attempt 1 of 10: not in sync: resp=0x00
avrdude-original: stk500_recv(): programmer is not responding
avrdude-original: stk500_getsync() attempt 2 of 10: not in sync: resp=0x00
avrdude-original: stk500_recv(): programmer is not responding
avrdude-original: stk500_getsync() attempt 3 of 10: not in sync: resp=0x00
avrdude-original: stk500_recv(): programmer is not responding
avrdude-original: stk500_getsync() attempt 4 of 10: not in sync: resp=0x00
avrdude-original: stk500_recv(): programmer is not responding
avrdude-original: stk500_getsync() attempt 5 of 10: not in sync: resp=0x00
avrdude-original: stk500_recv(): programmer is not responding
avrdude-original: stk500_getsync() attempt 6 of 10: not in sync: resp=0x00
avrdude-original: stk500_recv(): programmer is not responding
avrdude-original: stk500_getsync() attempt 7 of 10: not in sync: resp=0x00
avrdude-original: stk500_recv(): programmer is not responding
avrdude-original: stk500_getsync() attempt 8 of 10: not in sync: resp=0x00
strace: |autoreset: Broken pipe
avrdude-original: stk500_recv(): programmer is not responding
avrdude-original: stk500_getsync() attempt 9 of 10: not in sync: resp=0x00
avrdude-original: stk500_recv(): programmer is not responding
avrdude-original: stk500_getsync() attempt 10 of 10: not in sync: resp=0x00
Any suggestions,
James
LikeLike
I ‘ve the same problem.
the modem is working but is not possible upgrade with this how to….
Raspberry 3
pi@raspdmr:~ $ sudo avrdude -p m328p -c arduino -P /dev/ttyAMA0 -b 115200 -F -U flash:w:DVMEGA_HB_V229_UNO.cpp.hex
avrdude-original: Using autoreset DTR on GPIO Pin 7
avrdude-original: stk500_recv(): programmer is not responding
avrdude-original: stk500_getsync() attempt 1 of 10: not in sync: resp=0x00
avrdude-original: stk500_recv(): programmer is not responding
avrdude-original: stk500_getsync() attempt 2 of 10: not in sync: resp=0x00
avrdude-original: stk500_recv(): programmer is not responding
avrdude-original: stk500_getsync() attempt 3 of 10: not in sync: resp=0x00
avrdude-original: stk500_recv(): programmer is not responding
avrdude-original: stk500_getsync() attempt 4 of 10: not in sync: resp=0x00
avrdude-original: stk500_recv(): programmer is not responding
avrdude-original: stk500_getsync() attempt 5 of 10: not in sync: resp=0x00
avrdude-original: stk500_recv(): programmer is not responding
avrdude-original: stk500_getsync() attempt 6 of 10: not in sync: resp=0x00
avrdude-original: stk500_recv(): programmer is not responding
avrdude-original: stk500_getsync() attempt 7 of 10: not in sync: resp=0x00
avrdude-original: stk500_recv(): programmer is not responding
avrdude-original: stk500_getsync() attempt 8 of 10: not in sync: resp=0x00
avrdude-original: stk500_recv(): programmer is not responding
avrdude-original: stk500_getsync() attempt 9 of 10: not in sync: resp=0x00
avrdude-original: stk500_recv(): programmer is not responding
avrdude-original: stk500_getsync() attempt 10 of 10: not in sync: resp=0x00
avrdude-original done. Thank you.
strace: |autoreset: Broken pipe
Regards!!
LikeLike
if you have a problems trying to update the firmware edit the file autoreset with these values:
def reset():
GPIO.setup(pin, GPIO.OUT)
GPIO.output(pin, GPIO.HIGH)
time.sleep(0.30)
GPIO.output(pin, GPIO.LOW)
time.sleep(0.5)
Now works in my case! Regards!
LikeLiked by 3 people
Could be the key to many an OM’s sleepless nights – thanks for the info!
LikeLike
I’ve tried this trick (changing the timings in auto reset) on a DVMega that was refusing to flash. It solved the problem! Thanks
LikeLike
Thanks – I couldn’t get past the “avrdude-original: stk500_getsync() attempt 10 of 10: not in sync: resp=0x00” message either, and ea4gkq’s tip to add time.sleep(0.5) was the final fix for me! I was trying to flash a DVMega single band to 3.17 using a fresh Jesse-lite image on a RPi3.
LikeLike
Yes, this seems to have been a good fix for most – myself included! FYI, you do know there’s a new version of Raspbian out? (Stretch – https://www.raspberrypi.org/downloads/raspbian/)
LikeLike
where do you put the new hex image, by that I mean what directory do you put the new file into to be written to the chip. I had one and only one successful write, but when I looked closely at all the info in detail it said:
pi@raspberrypi:~/avrdude-rpi $ avrdude -p m328p -c arduino -P /dev/ttyAMA0 -b 115200 -F -U flash:w:DVMEGA_HR_V306_UNO.cpp -v
avrdude-original: Version 6.1, compiled on Jul 7 2015 at 10:29:47
Copyright (c) 2000-2005 Brian Dean, http://www.bdmicro.com/
Copyright (c) 2007-2014 Joerg Wunsch
System wide configuration file is “/etc/avrdude.conf”
User configuration file is “/root/.avrduderc”
User configuration file does not exist or is not a regular file, skipping
Using Port : /dev/ttyAMA0
Using Programmer : arduino
Overriding Baud Rate : 115200
avrdude-original: Using autoreset DTR on GPIO Pin 7
AVR Part : ATmega328P
Chip Erase delay : 9000 us
PAGEL : PD7
BS2 : PC2
RESET disposition : dedicated
RETRY pulse : SCK
serial program mode : yes
parallel program mode : yes
Timeout : 200
StabDelay : 100
CmdexeDelay : 25
SyncLoops : 32
ByteDelay : 0
PollIndex : 3
PollValue : 0x53
Memory Detail :
Block Poll Page Polled
Memory Type Mode Delay Size Indx Paged Size Size #Pages MinW MaxW ReadBack
———– —- —– —– —- —— —— —- —— —– —– ———
eeprom 65 20 4 0 no 1024 4 0 3600 3600 0xff 0xff
flash 65 6 128 0 yes 32768 128 256 4500 4500 0xff 0xff
lfuse 0 0 0 0 no 1 0 0 4500 4500 0x00 0x00
hfuse 0 0 0 0 no 1 0 0 4500 4500 0x00 0x00
efuse 0 0 0 0 no 1 0 0 4500 4500 0x00 0x00
lock 0 0 0 0 no 1 0 0 4500 4500 0x00 0x00
calibration 0 0 0 0 no 1 0 0 0 0 0x00 0x00
signature 0 0 0 0 no 3 0 0 0 0 0x00 0x00
Programmer Type : Arduino
Description : Arduino
Hardware Version: 3
Firmware Version: 4.4
Vtarget : 0.3 V
Varef : 0.3 V
Oscillator : 28.800 kHz
SCK period : 3.3 us
avrdude-original: AVR device initialized and ready to accept instructions
Reading | ################################################## | 100% 0.00s
avrdude-original: Device signature = 0x1e950f
avrdude-original: safemode: lfuse reads as 0
avrdude-original: safemode: hfuse reads as 0
avrdude-original: safemode: efuse reads as 0
avrdude-original: NOTE: “flash” memory has been specified, an erase cycle will be performed
To disable this feature, specify the -D option.
avrdude-original: erasing chip
avrdude-original: reading input file “DVMEGA_HR_V306_UNO.cpp”
avrdude-original: error opening DVMEGA_HR_V306_UNO.cpp: No such file or directory
avrdude-original: input file DVMEGA_HR_V306_UNO.cpp auto detected as invalid format
avrdude-original: can’t open input file DVMEGA_HR_V306_UNO.cpp: No such file or directory
avrdude-original: read from file ‘DVMEGA_HR_V306_UNO.cpp’ failed
avrdude-original: safemode: lfuse reads as 0
avrdude-original: safemode: hfuse reads as 0
avrdude-original: safemode: efuse reads as 0
avrdude-original: safemode: Fuses OK (E:00, H:00, L:00)
strace: |autoreset: Broken pipe
strace: |autoreset: Broken pipe
strace: |autoreset: Broken pipe
strace: |autoreset: Broken pipe
strace: |autoreset: Broken pipe
avrdude-original done. Thank you.
strace: autoreset: Broken pipe
Afterwards I tired putting the file into other directories not knowing where exactly it should be, However I could never get the program to run a second time. Every other time I try to use it the program just hangs and the pi seems frozen. I am going to try formatting the SD card yet again and try once more. I am using the DVcommander software. Can you tell me where the file should be placed for avrdude to see it. Also in the area where you describe how to stop services there is a section as lised:
ls -l /dev/ttyAMA0
crw-rw—T 1 root dialout 204, 64 Mar 10 13:47 /dev/ttyAMA0
sudo usermod –a –G dialout
What username do they refer to, I just used root as a user name, is that correct
Sorry for all the questions, but I am not very good with Linux, but I am slowly learning, 🙂
Thank you
James
LikeLike
The file goes wherever you like, you just point the command line at it!
You’re best off running the command from the same directory the file is in if this is confusing.
LikeLike
Thank You for your patients and all your Help, I believe by what I see in the file I have listed below it did work this time?
pi@raspberrypi:~/avrdude-rpi $ avrdude -p m328p -c arduino -P /dev/ttyAMA0 -b 115200 -F -U flash:w:DVMEGA_HR_V306_UNO.cpp.hex -v
avrdude-original: Version 6.1, compiled on Jul 7 2015 at 10:29:47
Copyright (c) 2000-2005 Brian Dean, http://www.bdmicro.com/
Copyright (c) 2007-2014 Joerg Wunsch
System wide configuration file is “/etc/avrdude.conf”
User configuration file is “/root/.avrduderc”
User configuration file does not exist or is not a regular file, skipping
Using Port : /dev/ttyAMA0
Using Programmer : arduino
Overriding Baud Rate : 115200
avrdude-original: Using autoreset DTR on GPIO Pin 7
AVR Part : ATmega328P
Chip Erase delay : 9000 us
PAGEL : PD7
BS2 : PC2
RESET disposition : dedicated
RETRY pulse : SCK
serial program mode : yes
parallel program mode : yes
Timeout : 200
StabDelay : 100
CmdexeDelay : 25
SyncLoops : 32
ByteDelay : 0
PollIndex : 3
PollValue : 0x53
Memory Detail :
Block Poll Page Polled
Memory Type Mode Delay Size Indx Paged Size Size #Pages MinW MaxW ReadBack
———– —- —– —– —- —— —— —- —— —– —– ———
eeprom 65 20 4 0 no 1024 4 0 3600 3600 0xff 0xff
flash 65 6 128 0 yes 32768 128 256 4500 4500 0xff 0xff
lfuse 0 0 0 0 no 1 0 0 4500 4500 0x00 0x00
hfuse 0 0 0 0 no 1 0 0 4500 4500 0x00 0x00
efuse 0 0 0 0 no 1 0 0 4500 4500 0x00 0x00
lock 0 0 0 0 no 1 0 0 4500 4500 0x00 0x00
calibration 0 0 0 0 no 1 0 0 0 0 0x00 0x00
signature 0 0 0 0 no 3 0 0 0 0 0x00 0x00
Programmer Type : Arduino
Description : Arduino
Hardware Version: 3
Firmware Version: 4.4
Vtarget : 0.3 V
Varef : 0.3 V
Oscillator : 28.800 kHz
SCK period : 3.3 us
avrdude-original: AVR device initialized and ready to accept instructions
Reading | ################################################## | 100% 0.00s
avrdude-original: Device signature = 0x1e950f
avrdude-original: safemode: lfuse reads as 0
avrdude-original: safemode: hfuse reads as 0
avrdude-original: safemode: efuse reads as 0
avrdude-original: NOTE: “flash” memory has been specified, an erase cycle will be performed
To disable this feature, specify the -D option.
avrdude-original: erasing chip
avrdude-original: reading input file “DVMEGA_HR_V306_UNO.cpp.hex”
avrdude-original: input file DVMEGA_HR_V306_UNO.cpp.hex auto detected as Intel Hex
avrdude-original: writing flash (30746 bytes):
Writing | ################################################## | 100% 4.37s
avrdude-original: 30746 bytes of flash written
avrdude-original: verifying flash memory against DVMEGA_HR_V306_UNO.cpp.hex:
avrdude-original: load data flash data from input file DVMEGA_HR_V306_UNO.cpp.hex:
avrdude-original: input file DVMEGA_HR_V306_UNO.cpp.hex auto detected as Intel Hex
avrdude-original: input file DVMEGA_HR_V306_UNO.cpp.hex contains 30746 bytes
avrdude-original: reading on-chip flash data:
Reading | ################################################## | 100% 3.41s
avrdude-original: verifying …
avrdude-original: 30746 bytes of flash verified
avrdude-original: safemode: lfuse reads as 0
avrdude-original: safemode: hfuse reads as 0
avrdude-original: safemode: efuse reads as 0
avrdude-original: safemode: Fuses OK (E:00, H:00, L:00)
strace: |autoreset: Broken pipe
strace: |autoreset: Broken pipe
strace: |autoreset: Broken pipe
strace: |autoreset: Broken pipe
strace: |autoreset: Broken pipe
avrdude-original done. Thank you.
strace: |autoreset: Broken pipe
pi@raspberrypi:~/avrdude-rpi $
Once again Thank You 🙂
This was using the DV commander V2.01 file image not modifed except for the instructions used on your site.
Regards,
James
LikeLike
Yes that worked (you probably know this already as I’ve been slow to reply and you’re probably already on air!)
LikeLike
Ok I have been reading this thread and I am accessing my Pi via putty
How do I get my pi to download the DVMEGA 3.06 hex image?
I have tried sudo apt-get download http://www.dvmega.auria.nl/images/DVMEGA_RH_V306_UNO.zip
But That doesnt work. I am knew to the pi commands required to get the image can you offer a hint please?
Cheers Mark G0NMY
LikeLike
wget http://www.dvmega.auria.nl/images/DVMEGA_RH_V306_UNO.zip
LikeLike
I would of even thought of wget thank you so much 73 Mark
LikeLike
Worked perfect for me first time. Thank you much for posting instructions. Used a pi3 and the latest Western dstar image. Mike
LikeLike
any one got an step by step document on how to flash my demega.
as i know nothing about programming.
all of the above i presume has the info but i believe it more for people that have programming skill.
eg what program do i use to flash the v mega how do i get it to read the firmware.
my dvmega has either lost its firmware or damaged after it put it on my pie on the wrong pins (argg) in error.
so i have nothing to lose by trying to reflash.
any help please
poul g7btp
LikeLike
That is a step by step guide!!!!
LikeLike
hi tony
i have sent you an email explaining that i have either killed my dvmega or just lost the firmware
all my dvmega dose now it just a red light flashing all the time.
I’am running commander 2.01 program.
i have done the first lot of instruction ok
and in the pi@raspberrypi:~/avrdude-rpi $ directory i have down loaded DVMEGA_RH_V306_UNO.zip file
is the next line supose to look like this
avrdude -p m328p -c arduino -P /dev/ttyAMA0 -b 115200 -F -U flash:w:DVMEGA_RH_V306_UNO.zip -v
or has the file to be unzipped.
regards poul
LikeLike
Hi Paul,
Got your email. If you connected the DVMega to the RPi incorrectly and applied power, it is indeed possible you’ve either damaged the DVMega or (more hopefully) only managed to wipe the chip. The problem is, by wipe the chip, people mean you’ve wiped the chip, bootloader and all – not just the DVMega firmware. The only way to recover is to get the chip reflashed with the Arduino bootloader then flash the DVMega firmware again – not something I’ve any experience at doing unfortunately!
The other option is to trawl eBay and buy a new chip with the Arduino bootloader already in place – all you have to do then is flash the DVMega firmware.
If this is what you decide to do, what you’re looking for is an ATMega 328P with the bootloader already installed for you.
Good Luck!
LikeLike
ok tony thanks for the info.
will see if i can get a chip sorted and hope fully get it running again.
just one more question a my friend would like to flash his mega that is working lol.
and we are still a bit confused on the last command.
I have down loaded the firm ware in to the avrdude dir
then would the last command be :-
avrdude -p m328p -c arduino -P /dev/ttyAMA0 -b 115200 -F -U flash:w:DVMEGA_RH_V306_UNO.zip -v
as when i do this on mine it just looks at me gone out because as you say it probably has no bootloader
much apprecated for all the help
been interesting playing with pi
poul g7btp
LikeLike
No, unzip the firmware first and its the resulting hex file you need to flash
LikeLike
FYI I’ve done the fix for PI3 to get the AMA0 port to be seen. I’ve run the command to flash the hex file 307, its just been sitting there for 15 mins and the dvmega led just flashes. before getting the AMA0 port free I would get the errors that the programmer was timing out. I have the dual band unit so if its bricked its back overseas to get fixed …perhapes the $19 programmer would have been better?
LikeLike
I’m sorry to hear you may have damaged your DVMega, but as the first lines of my article state, you do this mod (as with any other mod to an amateur radio rig) AT YOUR OWN RISK.
LikeLike
Gents, due to the length of this thread, I will shortly be editing some of your posts to leave the pertinent help easier to find. Please don’t be offended if your post disappears, or is truncated somewhat.
Tony
G0WFV
LikeLike
Well , it didn’t end up brickin’ it ATony ! just got dumb for awhile 😉
LikeLike
Phew I’m glad to hear all is fine 🙂 the Arduino is a very robust device (pretty much what a DVMega is!) and can take some punishment!
LikeLike
got dumb but not updated..I will into why for the best of the others
LikeLiked by 1 person
There are some good tips in this thread from other people who ran into issues. Particularly the one about changing the reset pulse timings in ‘autoreset’
LikeLike
I would like to know if it is possible to update the DVMega in Ubuntu, so i don’t have to deal with Microshaft every time there’s an update. Instead of the Arduino i use the Bluestack Microplus.
LikeLiked by 1 person
It’s probably possible, unfortunately, I’ve no experience with the Blue stack devices – Sorry
LikeLike
I got mine to update by removing the Dual band radio out of my DVLAP that has a PI3 in it and put it on a PI2 with the starting image I tried to use to get it work on the PI3. Now to see if MMDVM will work on the Pi3 now, before it was saying unable to read firmware 6 times… even with AMA0 being not used by anything and showing up in the /dev/ttyAMA0 . Thanks for your Work on this G0WFV, Art
LikeLike
Hi Tony,
Thanks for sharing this info. I have a new Dual Band DVmega for a new R Pi 2 that, as usual, has no indication of what firmware version is programmed on it. MMDVM stops at the same place as if it is not up for anything but D-STAR. Can’t tell me the firmware version in the log files. So I came here to follow this procedure to get it flashed up to 3.07. Not having any luck no matter what I do. I keep getting the 10 of 10 not in sync failure. I have tried three different working images. I have also tried a fresh Jessie Lite disk image (no GUI support with startx ???), and two times with the latest Jessie with Pixel fresh image. Fails every time. I’m not a Linux guy, but not totally noob. However, I need command line level help that will get me past any serial device conflicts, as I may not understand things that sound simple to more experienced users. When someone posts a fix, I would hope that noob level instructions would be posted.
I read about this issue and attempted to do as recommended:
1. raspi-config and disable console over serial
2. edit /boot/config.txt and change enable_uart=0 to enable uart=1
3. systemctl disable ModemManager.service
On number 1 I have no option to disable console with raspi-config. I see disable Kernel on serial, but is that the same?
On number 2 I am not permitted to change this file or overwrite it. Access denied! What is the trick to modifying this file in Boot?
On number 3, if this is a command, it fails to recognise it, so how exactly do I disable ModemManager.service?
And how would I check to see if something hooked the port in the first place? This brand new Jessie image has nothing else running or installed. I just followed the exact commands and had the same trouble many others have reported.
I also changed the fore mentioned timing settings with no improvement or success. Still not communicating.
Can you, or someone here, spell out commands to accomplish the port checks and clearing operations? I sure would like to get this accomplished, but three long days of trying is getting frustrating.
Thank you for the help.
Phil N2HUC
LikeLike
Having some problems. Raspberry Pi 3, dual band DV Mega.
I solder in everything, install avrdude as instructed. I hit run. The LED on the DV Mega turns off. The following appears on the screen.
avrdude-original: Version 6.1, compiled on Jul 7 2015 at 13:18:47
Copyright (c) 2000-2005 Brian Dean, http://www.bdmicro.com/
Copyright (c) 2007-2014 Joerg Wunsch
System wide configuration file is “/etc/avrdude.conf” [40/195]
User configuration file is “/root/.avrduderc”
User configuration file does not exist or is not a regular file, skipping
Using Port : /dev/ttyAMA0
Using Programmer : arduino
Overriding Baud Rate : 115200
avrdude-original: Using autoreset DTR on GPIO Pin 7
And it stops. The LED on the DVMEGA comes back on. Nothing else happens.
What gives? It’s almost as though it isn’t soldered on, but it definitely is.
LikeLike
it is possible to replace /dev/ttyAMA0 into /dev/ttyUSB0 when using a bluestack plus and connected with usb in serial mode. However the -c parameter should be something like FT230x I asume instead of arduino? Can anyone confirm ?
LikeLike
I have no experience of using a bluestack, but you will need to have the jumper soldered as per the instructions for the bluestack if it’s to work at all.
LikeLike
[…] da Raspberry, senza scollegarla ma semplicemente saldando un poticello cosi come propone il collega G0WFV dal suo sito, dichiarando che è una procedura eseguita da lui più volte ed anche dal nostro collega IW8ELN, […]
LikeLike
Hi.
There should be 5V on atmega pin 1, when I connect it with gpio?
I have never got message: “avrdude-original: Using autoreset DTR on GPIO Pin 7”.
I have: avrdude-original: stk500_recv(): programmer is not responding, …anyway 😦
LikeLike
Don’t connect to 5v! You need to connect to a controllable GPIO pin.
LikeLike
my dvmega is died raspberry
stk500_recv(): programmer is not responding
Unable to read the firmware version after six attempts
E: 2017-08-04 16:02:10: Cannot open the D-Star modem
please help-me
LikeLike
I soldered the wire on my single band dvmega and followed all the instructions on file installation.
This is what I type on command line at the last instruction:
avrdude -p m328p -c arduino -P /dev/ttyAMA0 -b 115200 -F -U flash:w:/home/rolf/Desktop/DVMEGA_RH_V318_UNO.hex -v
And this is what I get:
avrdude-original: Version 6.1, compiled on Jul 7 2015 at 13:18:47
Copyright (c) 2000-2005 Brian Dean, http://www.bdmicro.com/
Copyright (c) 2007-2014 Joerg Wunsch
System wide configuration file is “/etc/avrdude.conf”
User configuration file is “/root/.avrduderc”
User configuration file does not exist or is not a regular file, skipping
Using Port : /dev/ttyAMA0
Using Programmer : arduino
Overriding Baud Rate : 115200
avrdude-original: stk500_getsync() attempt 1 of 10: not in sync: resp=0xd0
avrdude-original: stk500_getsync() attempt 2 of 10: not in sync: resp=0x08
avrdude-original: stk500_getsync() attempt 3 of 10: not in sync: resp=0x00
avrdude-original: stk500_getsync() attempt 4 of 10: not in sync: resp=0x47
avrdude-original: stk500_getsync() attempt 5 of 10: not in sync: resp=0x00
avrdude-original: stk500_getsync() attempt 6 of 10: not in sync: resp=0x00
avrdude-original: stk500_getsync() attempt 7 of 10: not in sync: resp=0xfc
avrdude-original: stk500_getsync() attempt 8 of 10: not in sync: resp=0x00
avrdude-original: stk500_getsync() attempt 9 of 10: not in sync: resp=0xe7
avrdude-original: stk500_getsync() attempt 10 of 10: not in sync: resp=0x45
avrdude-original done. Thank you.
What am I missing?
LikeLike
I couldn’t say for sure, but something isn’t installed correctly judging by the error message about not being able to find the avtdude user cofig file.
Make sure avrdude is installed properly?
LikeLike
i removed avrdude and reinstalled it. Made changes to GPIO sleep timings as referred to in an earlier post as well. Still not able to get it to update. Will give it a rest and do some more research. If something is hogging the port, not sure how to stop it. Tried using sysctl to disable ModemManager, but i do not think it is even on this machine. No reference to it when you dump the variables by sysctl -a.
I am not getting errors refering to programmer not responding. just something about not syncing.
LikeLike
After some research, it appears that avrdude is NOT hearing from the controller on the board. So something is either not working on the port or the problem is in hardware. I will attempt again using a plain vanilla Raspi image. Was trying to do it thru DStar Commander build of Linux. Decided to try simpler setup.
LikeLike
Good News! I was successful! I installed all of the software on a fresh Raspian install. Last thing that made it work was adjusting the timings on the reset function in /avrdude-rpi/autoreset.
LikeLiked by 1 person
For those wanting to do this and running pi-star, here’s how I was able to do it:
SSH to the pi-star, login as pi-star
type rpi-rw to enable read/write
cd to /home/pi-star (or wherever you want, but this seems like a good place)
get the hex file onto the pi either by SCP, FTP, wget, or directly writing to your SD card
disable the services using the serial port:
sudo systemctl stop mmdvmhost
sudo systemctl stop mmdvmhost.timer
sudo systemctl stop dmrgateway
sudo systemctl stop dmrgateway.timer
sudo systemctl stop pistar-watchdog
sudo systemctl stop pistar-watchdog.timer
Then follow the instructions in this article. I had some trouble at first with the reset not working and thus the rest of the operation failing. I’m not entirely sure why this happens, probably something is still keeping the port open. Just keep trying the avrdude command. Mine works after several minutes.
LikeLike